
When you buy a new Mac, the most challenging question is to define how much space you’ll need. If your Macbook comes with a relatively small amount of SSD, such as 128 GB, you have to be frugal in most cases. Wouldn’t it be ideal if we could just hit a button and upgrade to 256 GB? Unfortunately, we can’t do that, but don’t despair. In this post, we’ll show you what to do if your Mac is running low on hard drive space. Let’s go!
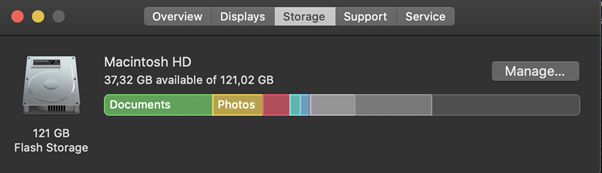
Your first thought probably is removing as many files as you can from your Mac, but don’t rush. Before anything else, you should check how your disk space is distributed among your programs, system files, photos, and the like. To do that, go to the Apple menu in the menu bar and click About this Mac and then pick Storage. In this tab, you’ll see how your disk space is being used.
Now, let’s take a look at what you can do to make some room on your Mac.
Remove Apple’s standard apps
Chances are, you don’t need every app that comes with your Mac. Check how much space apps such as GarageBand or iMovie take. Why not remove these apps if you don’t produce music or edit movie clips? That move alone can win you up a couple of gigabytes of open disk space. If you ever need these apps, you can find them on the Mac App Store.
Clear the Bin
Using the Bin as storage isn’t the best idea, as items you keep in it may take up a lot of disk space, given that the Bin counts as a folder on your hard drive. With this in mind, you should empty the Bin regularly. It’s also important to check the apps with built-in bins, such as Photos, Mail, and iMovie. Be sure to clear items in those apps as well.
Delete unneeded apps
Applications can take up a lot of disk space, so you should dive into the list of everything you’ve ever downloaded from the Mac App Store and third-party app developers as well. For a list of all installed apps, go to Finder – Applications – Show items. Found apps you no longer need? Uninstall them and see how much free space it brings you.
Purge the files in your Downloads folder
Everything you download goes to your Downloads folder. If it’s been a while since you’ve checked its contents, it’s time to dive into it. Here’s how you can find and clear your downloads:
- Launch Finder located on your Dock;
- Select Downloads in the sidebar on the left;
- Go over the files and delete ones you no longer need;
- Alternatively, press Command + A to remove all items in one go;
- Right-click and choose “Move to Bin;”
- Clear the Bin after you’re down.
Declutter your desktop
A disorganized desktop can make your Mac run out of space sooner than you expect, given that macOS treats the desktop as a separate folder. Thus, it’s wise to keep it neat. The best way to go about it is to sort items into different folders, each serving its own purpose, such as “work,” “personal,” “project,” to name a few. You can create folders by going the following path:
- Right-click anywhere on the desktop;
- Select New Folder;
- Change the name of the folder after clicking on it;
- Hit the Return key.
That’s all! Create as many folders as you see fit and drag items to them until your desktop is clean.
Use the Manage Storage feature
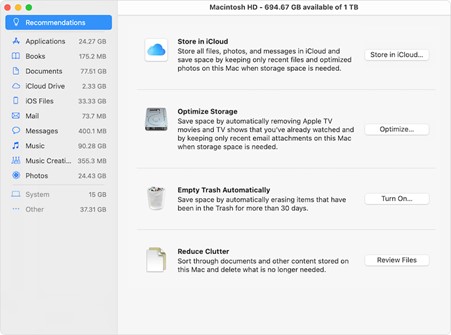
image via Apple Support
Mac’s Storage Management feature is the best way to deal with a crowded Mac. It lets you save space on your Mac through several options, such as:
- Store in iCloud: Transfers your files to the iCloud;
- Optimize Storage: Deletes movies you’ve already seen;
- Empty Bin Automatically: Clears 30-day old items in your Bin, just in one click;
- Reduce Clutter: Lets you review and remove files one by one.
When it comes to saving space on your Mac, the most valuable feature, in our opinion, is Store in iCloud, which can help you make a lot of room on your disk. It enables you to store your files in virtual storage while keeping their lightweight copies in their usual places, such as Desktop, Documents or Photos so that you can find and access them easily.