Installation
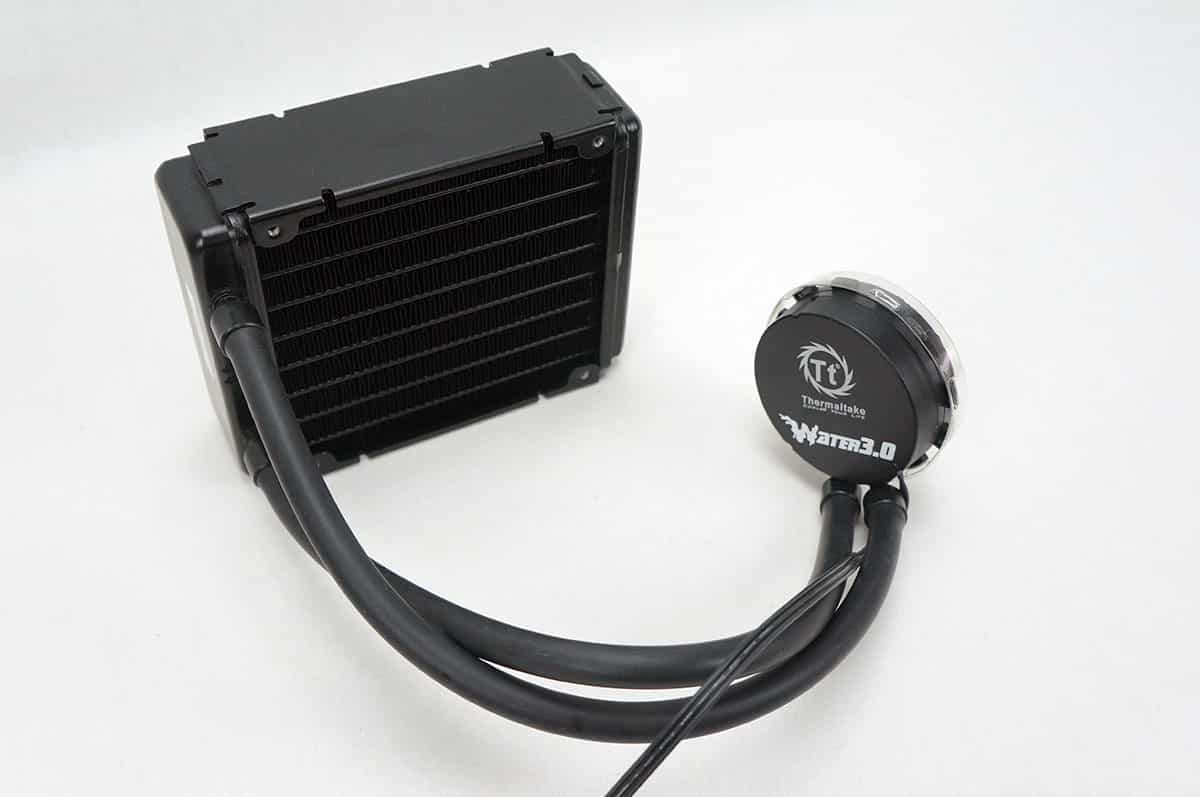
Installing these units has become easier and easier over time thanks to improved mounting systems by most all manufacturers. Tt’s is no exception, and the Water 3.0 Pro could easily be installed in a matter of 10 minutes if time was an issue.
The first step is to prepare the back plate to be mounted. You will want to select the one that is correct for your socket of course. Ours is 1155 so we chose the Intel backplate which is the more square of the two. Next you will need to insert the threaded pins that the mounting screws will lock into. Pay careful attention to the markings on the backplate as they indicate which hole is right for you.


With all four pins in the correct place you now need to attach the double sided foam tape. There is an obvious flat place on both sides of the mount where this goes.


Now you will need to prepare the top mounting ring. Take the small plastic clips and orient them with the correct socket markings facing out and snap them together.


Now you simply take the mounting screws; again for your correct socket (2011 has larger threads all other socket types use the other set of screws), and push them into the clips you just installed until they too snap into place.

With both mounting plates set, orient your case so you can access the back of the motherboard. Take the backplate and line the pins up with the holes, press the pads firmly into place. The tape makes the installation convenient as it will hold the plate in place while you work on the other side of the board.

Switching to the front of the case you will now want to attach the pump to the CPU. Take the mounting ring and slide it from the bottom of the pump through to the top using the key like gaps. Now turn the ring so that the tabs line up on both the ring and the pump and hook them into place.


With the pump ready carefully line the screws up with the socket holes and press firmly down on the pump. Now that the pump is in place on the CPU hold it with one hand and begin to tighten down the screws in a cross pattern until it is fully secured.

Our next step is to attach the radiator to the case. Since you already have it secured to the CPU you know exactly how far away you can install it without have to guess and hope it will work. We are simply going to attach our to the top back fan space. This is probably the most popular place for a 120mm radiator to be installed.
Start by first attaching the tube side fan. Put the fan in the pull position, we want to pull air in because that air will first pass through the radiator and will have the most cooling potential.

At this point you will want to line the other fan up on the opposite side of the radiator (fan facing the same direction as the first please) and sandwich it against the back of the case. There is no easy way to do this other than keeping the fan in place with pressure. From the back of the case insert and attach the four mounting screws.

Congratulations, at this point as the only thing left to do is to attach power and fire it up. For the fans please use the included PWM splitter and attach them to the CPU_FAN header. This will allow BIOS to control fan speed based on temperature. You could also do this using a piece of software such as SpeedFan to manually control their speed. Lastly attach to pump’s 3 pin connector to any open header on the motherboard.


90 Bucks I will stick with my Kraken x60 for better Cooling.
Apples and oranges friend. The Kraken x60 is a good cooler though; glad your happy.
What about this?http://apac.coolermaster.com/en/product/Detail/cooling/seidon/seidon-120m.html
We’ve not reviewed the CM Siedon 120. The 240 however was an excellent AIO and I would expect similar performance from the 120 on a lower scale of course.
Nice video that you have posted in blog.This video has clearly signifies about the PC Water cooling system .You have mentioned that how Water cooling system is used to cool the PC and removes the heat from the computer.