New Server Build
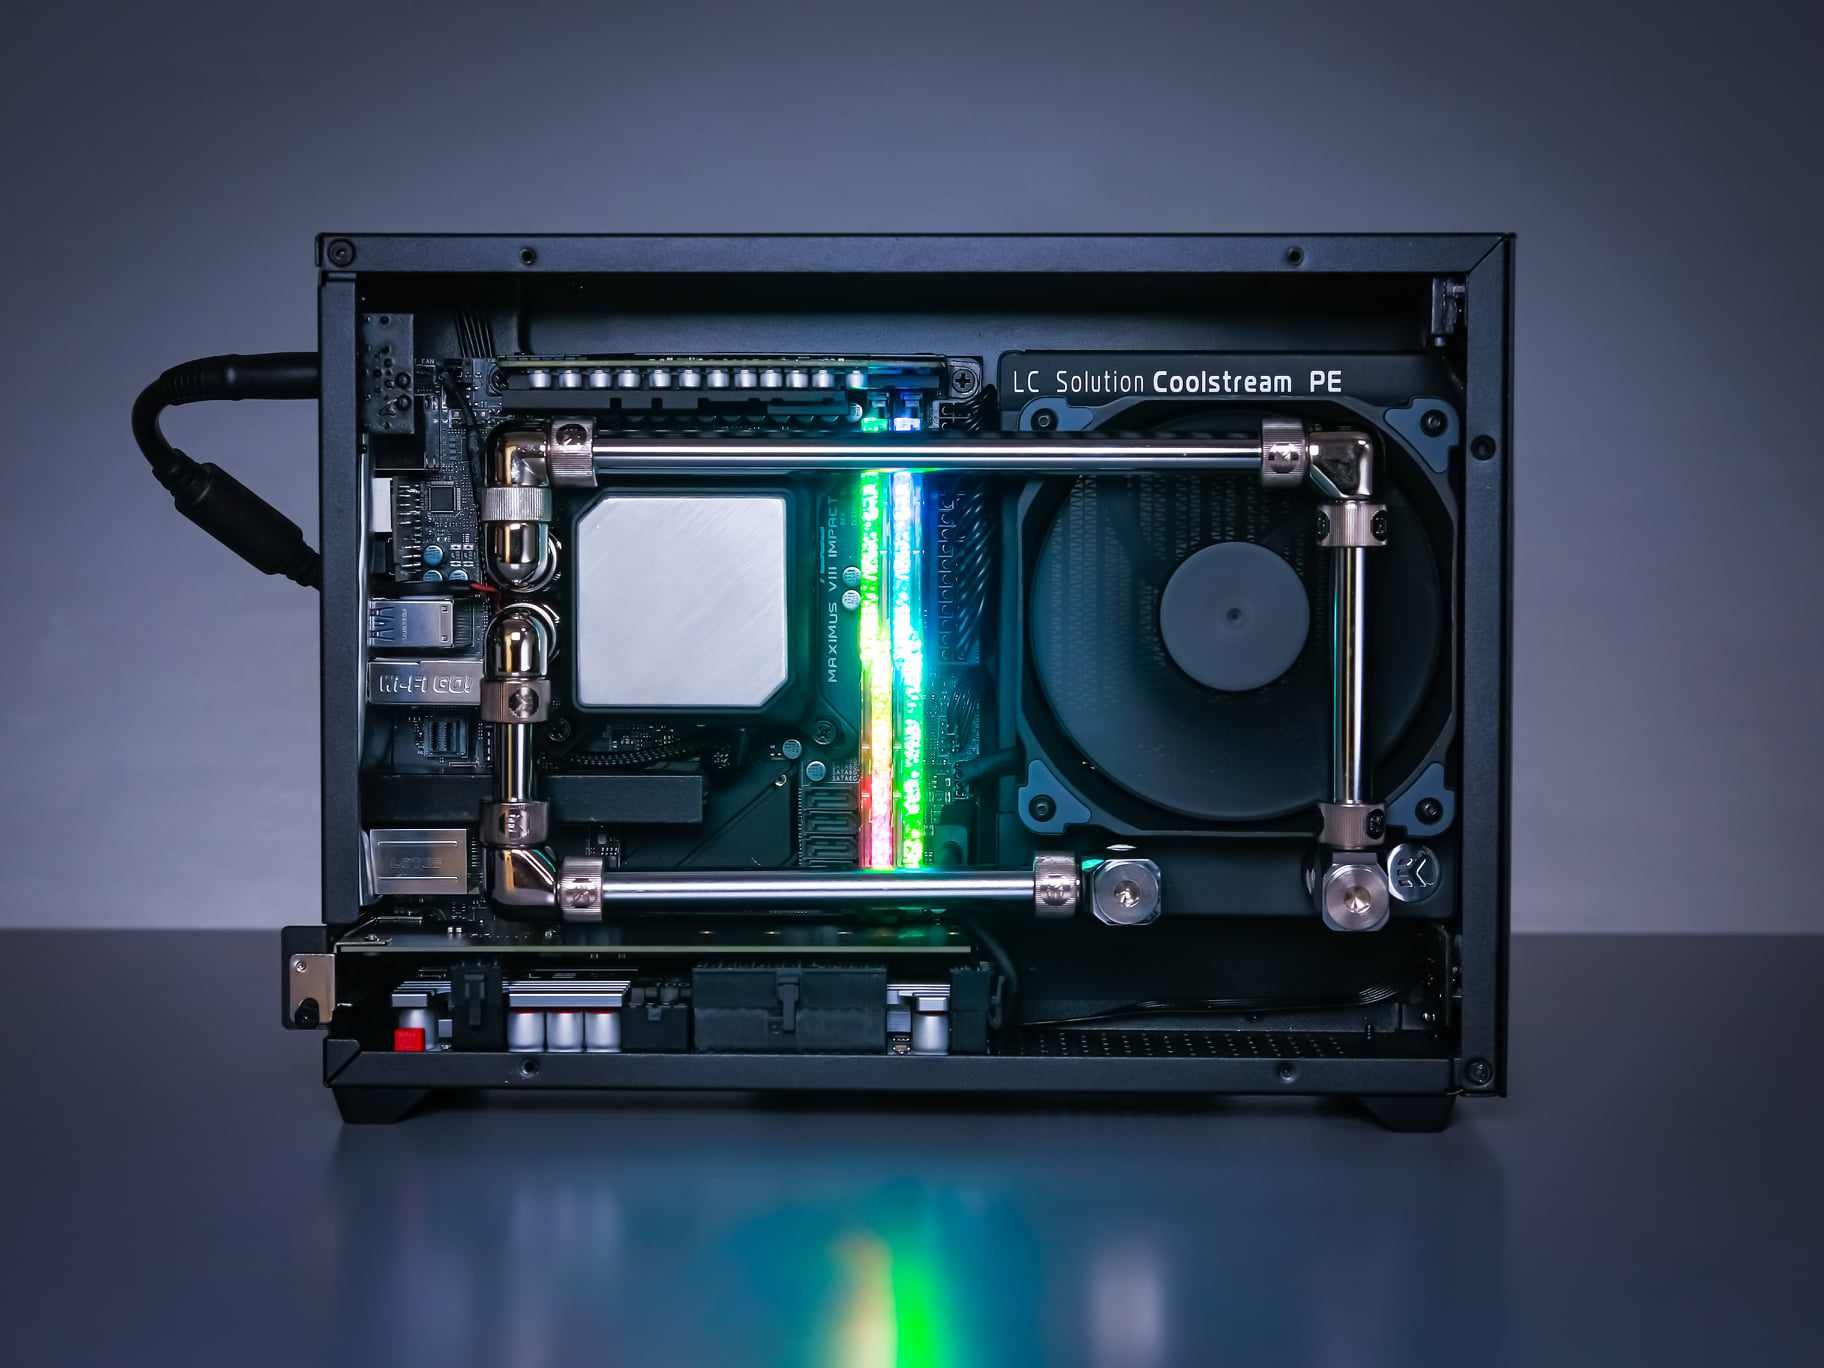
Now that I’ve given a bit of an overview of the old setup, let’s dive into the new build. As I mentioned earlier, I have a decent amount of extra hardware that has built up over the years, but one part in particular was really bothering me as it just sat there – an AMD Ryzen 7 3800X. Last year I upgraded from the 3800X to a 5800X3D, and the 3rd Gen Ryzen CPU had been sitting around collecting dust. I knew it would make a great server CPU, but I didn’t have another AM4 motherboard, and so it sat for a year or so. I had finally had enough of staring at it, and decided to take the leap towards a rebuild of the home server setup. I had been considering using the SilverStone CS351, a shoebox-style case with five, 3.5″ hot-swap bays on the front of the case, and an additional eight spots for 2.5″ drives inside. I liked the idea of the CS351 because of its small form factor, while still having room for up to an mATX motherboard, ATX PSU, and all of those drives. But after talking with SilverStone, they recommended, and ultimately convinced me, that the CS382 might be a better fit. A short while later, the CS382 was on my doorstep, along with a DA750 power supply. You can check out the full review of the CS382 here, but the short version is that it offered me more physical room, additional external drive bays, and improved cooling potential. The full list of components for the build are listed below, along with a short summary of why I went with these choices.
CPU: AMD Ryzen 7 3800X – I retired the 3800X in the fall of 2022 when I swapped in a 5800X3D to gain access of improved system performance, especially when related to gaming. The thought of the 3800X just sitting, unused, really bothered me, and I knew it had plenty of life left, and would make an excellent processor for this project. The headroom of 8 cores and 16 threads will offer me a long lifetime for this system.
Motherboard: Gigabyte B550M AORUS Elite – mATX is my favorite motherboard formfactor, and being that the SilverStone CS382 supports up to mATX, this board made the most sense. With four DDR4 slots, and support for up to 128GB of RAM, I knew that my days of being constrained by memory on my smaller servers were close to being over. The multiple Gen4 M.2 slots, as well as multiple PCIe slots offer flexibility with regards to the storage and add-in card options I had in my plan.
RAM: 64GB DDR4 – My RAM choice was mostly set by what I had on-hand, and the 64GB across four sticks is still much more than the combined total found in my individual servers. I’ve also got the option to expand all the way to 128GB should the need arise.
GPU: NVIDIA Quadro K620 – As the Ryzen 3800X does not offer any integrated graphics, I needed some way to visually interact with my server during setup and troubleshooting, and I just happened to have the K620 in my boneyard. It doesn’t require external power, and its performance is enough to handle some basic video transcoding should I choose to shift that workload to the GPU in the future.
Disk Controller: LSI SAS 9271-8i – Offering SAS and SATA compatibility, the 9271-8i pairs up perfectly with the CS382’s 8-drive, hot-swap bay that supports both SAS and SATA drives. I had considered going with a full-on Unraid server for this project, but the fact that the 9271-8i doesn’t natively support the direct disk addressing that Unraid requires, was a leading factor in going with a different OS solution.
Tier 1 Storage: 2 x 512GB TOSHIBA NVMe Gen3 SSDs – This pair of M.2 Gen3 NVMe drives serves as a home for VMware ESXi, as well as the primary OS storage for the virtual machines running on the server. Again, these were drives I had on-hand, and will most likely be upgraded to 2TB+ Gen4 drives sooner than later.
Tier 2 Storage: 8 x 6TB Western Digital Enterprise HDDs – I took full advantage of the eight available hot-swap drive bays in the CS382, and loaded them up with a total of 42TB of raw storage. Paired up with the LSI 9271-8i, I configured them in a RAID 6 array for a total of just under 33TB of usable storage. This mass of storage will be used for bulk storage of data that doesn’t have the speed requirements of the data being stored on the NVMe drives.
NIC: Intel ne1000-based NIC – Unfortunately, the on-board Realtek NIC on the B550M AORUS Elite motherboard is not supported by VMware ESXi, so I needed to utilize an add-in card for network connectivity. In the future I plan to swap this out with either a multi-port gigabit Ethernet card, or possibly a multi-gigabit card.
CPU Cooler: Cryorig H5 Universal – The H5 Universal is a great looking, and great performing tower cooler that is rated for up to 160 watts of cooling, which should be plenty for the Ryzen 7 3800X’s 105 watt TDP.
Case: SilverStone CS382 – As mentioned previously, the CS382 just checked so many boxes on my proverbial requirement list, that it was pretty much a no-brainer.
PSU: SilverStone DA750 – With full modularity, 80 Plus Gold certification, and a design made for 24/7 operation, the DA750 will keep things tidy within the case, as well as providing me with long-lasting, reliable power that doesn’t break the bank.

With the build complete, it was time to install my operating system(s) of choice. I mentioned virtualization previously, and for this server I have chosen to install VMWare’s ESXi hypervisor to manage all of the virtual servers. As I noted earlier, I have worked with virtual machines in a VMware environment years ago, so I am pretty familiar and comfortable with that platform. I know that it will offer me the flexibility I wanted to have with my home server environment, and so it just made sense to go with that option. Taking advantage of a free license for personal use is the route I took, and I have the option to convert to a more robust license if I want to take advantage of VMware’s VMUG Advantage program for IT pros.

Now that I had a server up and running, with a blank canvas to work on, it was time to convert my old physical servers to virtual machines running on their new hardware. Thankfully, tools like VMware’s vCenter Converter make this a snap. Installing this application on either the host needing converted, or another system, you can easily take the operating system and everything else related to the software build of the physical system and convert it to run as a virtual machine. This is such an amazing tool that can help extend the life of a system that might be operating on hardware that is no longer supported, or to modify or expand a system that just doesn’t have those capabilities.
With all of the old systems converted and running on the new server, I took this opportunity to roll out an Unraid virtual server. While I don’t recommend running Unraid in a virtual configuration in most cases, as I don’t plan to put any really critical services on there, I don’t mind running it virtually. Sure, there may be some additional overhead when it comes to Unraid accessing the drives via ESXi, especially since they are then accessed via the LSI card, but I think my needs for Unraid will be just fine in this configuration. One additional configuration required to run Unraid in a virtual environment is passing a USB drive that holds the Unraid configuration through to the virtual machine. This is easy enough with a bit of configuring in VMware, but something to consider when running like this.