Whether it is for upgrading your existing computer hardware or bragging about your PC to your friends, you will need to know your computer’s specs.
If you want to check your computer specs but don’t know where to start, this article is for you. Multiple methods will be covered, any of which you can use to know your computer specs.
I’ve written this step-by-step guide in a way that is equally appropriate for novice users while also for seasoned computer enthusiasts. So come, let’s not waste any more time and jump straight into it.
How to Check the Computer Specs?
There are multiple ways to check your computer specs; however, for the sake of convenience, I have picked the ones that can bring results easily and quickly.
I have also divided this section into specific computer hardware parts, so you don’t beat around the bush and get the specific information you need.
Checking the CPU
Using these simple steps, you can find out which CPU is installed on your computer.
- Navigate to the Windows logo at the bottom left of your screen and right-click on it.
- From the menu, select the System option.
- Next to the processor heading, you will find complete information about the CPU installed on your PC.
I recommend saving your CPU specs in notes or on a sheet of paper so that next time you need it, it is available right then and there.
Checking the GPU
Whether for updating the drivers or downloading the software, you will frequently require the graphics card specs. Here’s how you can find the GPU installed on your PC.
- Navigate to the Windows search bar. It is located next to the Windows logo on the bottom left of your desktop screen.
- Type in device manager and press the Enter key on your keyboard.
- On the new device manager window that opens, navigate to the display adapters option and click on the drop-down menu.
- Subsequently, your GPU make, and model number will be displayed.
If multiple names are listed under the display adapters tab, don’t panic. Sometimes your PC can come with integrated graphics, which should be labeled as something like Intel UHD graphics 770 in case of a PC and Intel Xe graphics in case of a laptop.
Bear in mind, only the high-end gaming PCs have high-end Intel chips with integrated graphics. Even my $1000 gaming PC doesn’t come with integrated graphics, so if your computer doesn’t have one, there is nothing to worry about.
Checking the Motherboard
Checking the motherboard specs of your motherboard is as easy as other hardware components. There are many methods, but here’s the fastest way to find your motherboard make, model number, and specs.
- Navigate to the Windows search bar, located right next to the Windows logo in the bottom left corner of your screen.
- Type in system information and press the Enter key on your keyboard
- A new window will open. On this window, scroll down until you find the Baseboard manufacturer, BaseBoard model, and BaseBoard name options.
- The BaseBoard manufacturer is the brand or the manufacturer behind your motherboard, while the BaseBoard model is the model number for your motherboard. Meanwhile, the BaseBoard name represents the name given to the motherboard by the manufacturer.
At times, these options can be blank and, therefore, of no use. If that happens with you, I have another method you can follow to get the details of the motherboard installed on your computer.
- The other method involves physically examining the motherboard for the model number label imprinted on the motherboard. This method will only work on a PC because it’s not only difficult to access the laptop motherboard, but you will also not find the model number label on it.
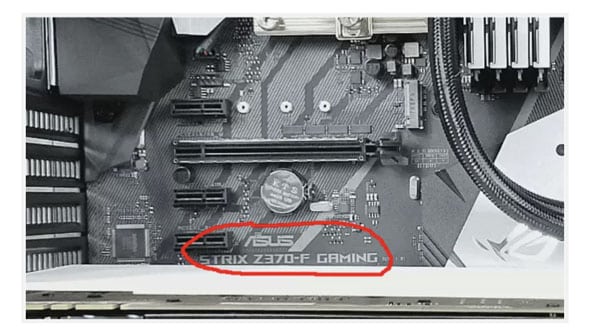
As you can see in the picture, the motherboard’s model number label will be placed near the PCIe slot where your GPU is connected. Sometimes, it might be shrouded by dust, so I recommend having a soft bristle brush with you.
Checking the RAM
Out of all the other components, checking the RAM specs is the easiest and can be done within minutes. The following is the method you need to follow.
- Navigate to the Windows logo found on the bottom left corner of your desktop screen and right-click on it.
- From the options menu, click on System.
- A new window will open. In this window, find the installed RAM option, which will have information on the RAM capacity of your PC.
Checking the Computer Specs Using Third Party Tools
Jumping around the Windows user interface to find information on different hardware can be a hassle. However, if you want a more streamlined way of checking your computer specs, I have you covered.
There are multiple third-party tools that provide a complete overview of your computer’s specs. Of course, with third-party tools, you compromise accuracy and some privacy.
However, that shouldn’t be much of an issue because you aren’t just going to use any tools; the tools I am recommending to you have been trusted by thousands of users over the years. They include,
- CPU-Z
- Speccy
- HWInfo
- MSI Afterburner
- Belarc Advisor
All of these tools are simple to install and use. However, if I was going to choose one, I would go with CPU-Z, just because it has a very beginner-friendly layout with intuitive menus.
Conclusion
These are some of the ways by which you can find your computer specs. In addition, I listed methods that can provide quick and fast results because, let’s be honest, nobody likes beating around the bush.
Now that you know your computer specs, I recommend saving them in notes or writing them down in your diary so you can quickly access them in case you need them again.
I hope you found this article helpful, and I wish you luck with whatever you will use the specs for. Actually, why not just tell us why you need your computer specs in the comment section down below.