Mac, one of the products of Apple, is the most popular personal computer that offers a wide range of features particularly designed to lead its users to ‘Think Better.’ That being said, Mac, in reality, has come out of the conventional personal computer concept long ago competing with Microsoft. Because Windows computers are more popular and widely used, it often occurs that the file format is not matched with the Mac supporting format.
The NTFS format is one of the relatable examples. Perhaps, you are aware of the term but never really given it a deep thought. This article will be an all-in-all guide on how you can use NTFS for Mac.
Before jumping into steps of making NTFS computable for Mac, it is important to know more about NTFS.

What is NTFS?
Initially developed for Windows NT version 3.1, the default file system for the OS, NTFS is the short form of NT File System. Many external drives are formatted to NTFS by default, as Windows is more widely used than macOS.
Due to the reason Apple don’t have the license to implement the file system on their computers, Mac computers cannot actually read or write NTFS directly; hence, it doesn’t support it properly. If you are looking forward to using your NTFS driver on your Mac, a third-party application will be required to access the NTFS formatted drive and read them; however, that’s likely not going to suit your needs.
Guide to use NTFS drive on Mac
In order to use the NTFS drive on your Mac, there are many things that you need to cover to operate properly. For instance, from changing the file changing the file type to accessing the drive properly. Although You can change the file type to something else, that can be tedious work! If you are thinking of exploiting the Terminal to get the writing access to NTFS, that would be the wrong decision.
Under such circumstances, you have the following options to use NTFS on your Mac., as such:
Format to FAT32
If you have an NTFS drive, you can use macOS’s Disk Utility to reformat it to FAT32. This is simple to do and means that the data on your external drive can be read and written on Macs and PCs.
Be aware that the FAT32 format is not as efficient as NTFS: it only supports files with a maximum size of 4 GB. This can be a problem if you are using the player to store high quality videos. For more information about FAT32 versus NTFS, see Microsoft Technical Support.
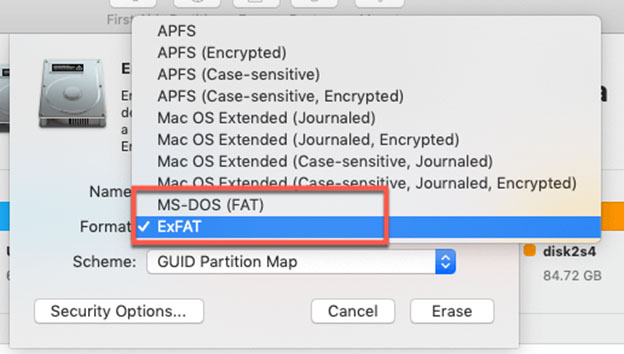
To get started, click on the Spotlight icon at the top right of your screen and enter ‘Disk’ to launch Disk Utility. Insert your NTFS drive or USB stick and click to highlight the name of the drive in the white box on the left side of the window.
Select the ‘Delete’ tab. Under “Format”, choose “(MS-DOS FAT)”. Enter a new name for the drive in the field above if desired.
Click ‘Erase’ to continue. Read the warning carefully before proceeding, as this process will delete all existing data on the drive. From now on, you will be able to move files to your drive and edit them in place from a Mac or PC.
Use a third-party app (macOS 12 Monterey beta & Apple M1 Mac support)
Of the several other options, using a third-party application is one of the best options because an application is designed in such a way so that users can get the privilege of writing NTFS on their Mac without putting their data at risk.
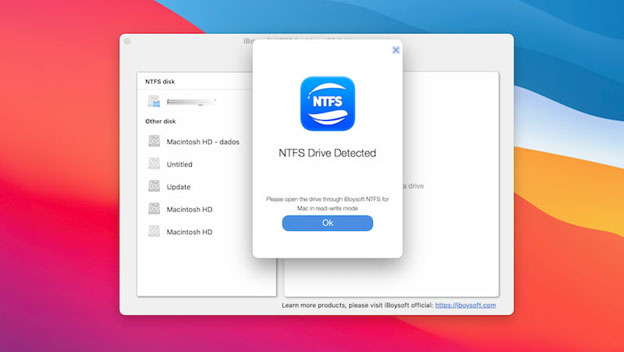
Perhaps, you are thinking about which third-party application you should choose in order to make it consistent in your everyday work. That being said, close your eyes and go for iBoysoft NTFS for Mac. It offers a free trial version of its features for days. Once installed, the application will mount your Windows drives thus allowing you to mount, unmount, verify, format, or set any of your Microsoft NTFS volumes as a startup disk.
In order to describe how effective iBoysoft NTFS for Mac is, it can be said that their latest version NTFS for Mac driver now skips over OSXFUSE. This signifies that it offers a better native read-write performance to the Windows NTFS drive. And it is understandable that you want your application to be faster and using this tool you will be able to write your NTFS faster without destroying your data.
Microsoft NTFS for Mac by iBoysoft supports the latest macOS 12 Monterey beta and macOS 11 Big Sur. It is fully compatible with the new Apple Silicon M1 Mac devices.
You can Download iBoysoft NTFS for Mac 7 days free trial on your Mac. Then restart your Mac computer. From now on, you naturally have full read and write access to any NTFS volume as if you were running Windows, all with efficient transfer rates.
There is no need to go back to the software, everything is done automatically. You plug in an NTFS volume and you will find it immediately after in your Finder. Then you can perform any operation.
Use Mac Terminal System (Not recommended)
If reformatting your NTFS drive for Mac isn’t an option, you can enable write support for specific Windows drives using macOS Terminal. This feature is experimental and could result in data loss. So be sure to make a full backup of your Mac and all data on the drive before proceeding.
The main advantage of using Terminal in this way is that it is fast and no third-party software is required. As this feature is still in the testing phase, however, your files can become corrupted at any time, so it is important to proceed with caution.
To get started, click on the Spotlight icon at the top right of your screen and enter ‘Terminal’. Connect your NTFS drive, then enter the following command:
sudo nano / etc / fstab

This will open the list of drives recognized by macOS. Use the directional arrows on your keyboard to reach the end and add the following line replacing “NAME” with the actual name of your NTFS drive, for example. USB1 (if you’re not sure what this is, just open Disk Utility):
LABEL=NAME none ntfs rw,auto,nobrowse
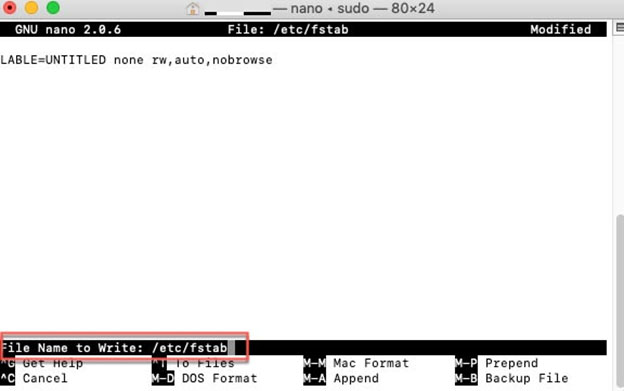
Press Ctrl + O to save the list, then press Ctrl + X to exit NANO. Then connect your Windows drive to the Mac.
Open Finder, then click Go ‘> Go to Folder, then type’ / Volumes / NAME ‘where’ NAME ‘is the name of your NTFS drive.
Click ‘Go’ to access your Windows drive. You should now be able to edit existing files and copy new ones here.