Installation
Typically I like to start my builds with the power supply first. Not sure why, but that’s just my normal mode of operation. This time I went ahead and installed my motherboard first, with the CPU cooler already attached. In order to install the motherboard however, there are a few steps that need to be taken.
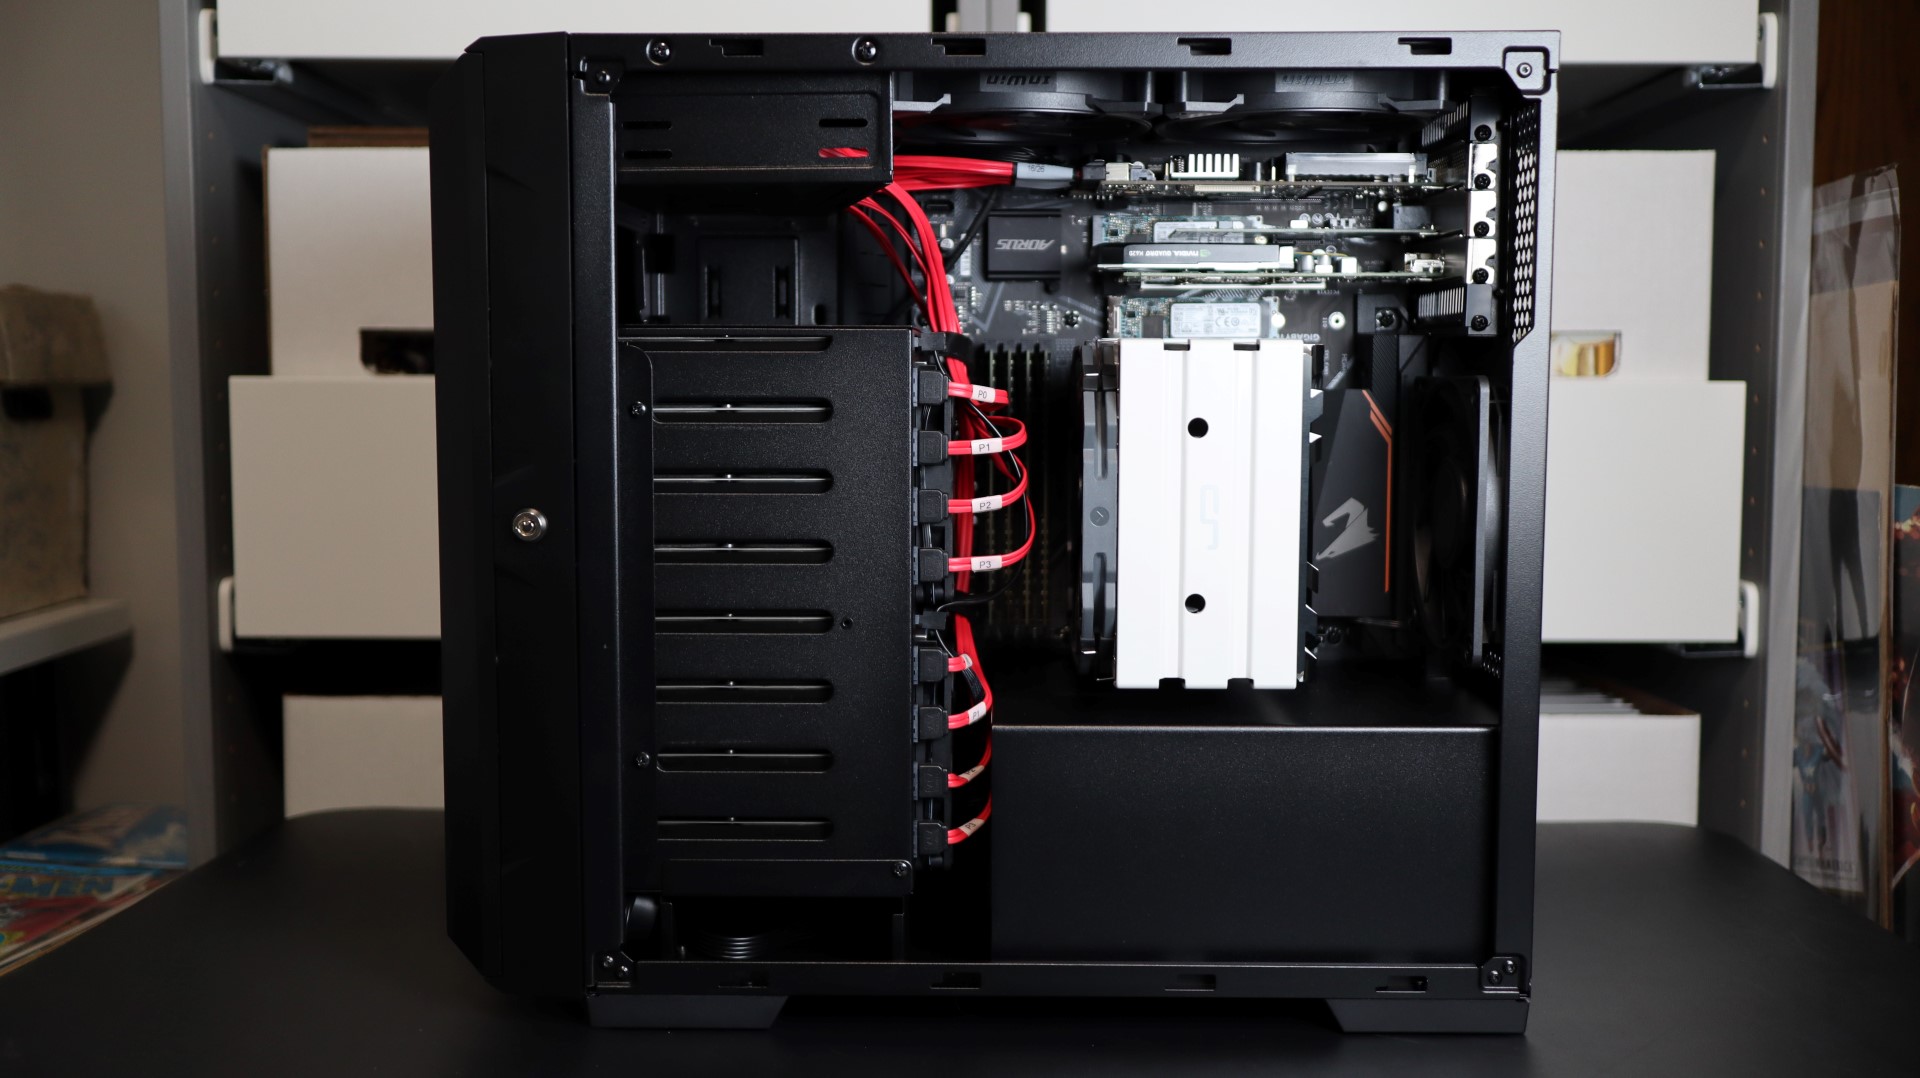
Remember the downsides that I mentioned earlier with regards to the drive cage? Another one is that you need to remove the entire drive cage from the case in order to install your motherboard. Without removing the cage, you wouldn’t be able to slide the motherboard into place, nor secure it with screws. You also wouldn’t have access to the hidden cable routing options on the motherboard tray to route and connect things like the 24-pin ATX connector, and potentially other items like SATA cables, front USB headers, etc.
Thankfully, removing the drive cage is quite simple – just two screws at the front of the cage, and three on the inside of the case. Once the screws are removed, the entire cage can slide out from the front of the case.

With the cage out of the way, there is plenty of room to work with, and installing the motherboard was a simple process. At the same time I also installed two 120mm fans at the top of the case to assist with exhausting duties. I installed these fans now as I would be utilizing all of the PCIe slots on my motherboard, and wouldn’t have the ability to install them after my add-in cards were installed.


Next up I decided to route all of my power supply, USB, and front panel cables for the motherboard, as once that drive cage is back in place, this option goes away.
My next component to install was the SilverStone DA750 that SilverStone also provided for use in this case review and my upcoming article. This fully modular power supply from their Decathlon Series features 80 Plus Gold certification and is ready for 24/7 operation, which is exactly how it will be used in my build. The modular design of the DA750 meant I only had to install the cables I would need for this build, and nothing else.

This really helps keep cabling mess to a minimum, which is a great benefit when working with a slightly cramped interior due to the drive cage of the CS382.

With all of my motherboard connections in place, it was time to slide the drive cage back into place and connect the two SATA power connections. The top power connector didn’t present any trouble, but the tight space around the lower connector due to it being mounted between the two fans made me feel like I was forcing that connection a bit. I’m not sure what the best solution to that would be, but it also meant that the flat cable included with the DA750 was covering up a portion of the top fan, which will most likely cut down on it’s overall efficiency.

Now that the cage was back in the case, installing the drives in their carriers was as simple as removing the snap-in strips from each side of the carrier, placing the drive, and snapping the strips back into place. Then simply sliding the drives and carriers back into place finished up that process.
Since I will be using this system as a virtual host, and not as a personal workstation, I had a few additional add-in cards to install in order to get up and running. These cards include a dedicated GPU, as the AMD Ryzen 7 3800X being used as the CPU does not have a built-in GPU, and I plan to offload some processes to the GPU as well. Additionally, I will be using a dedicated NIC that is supported by my OS of choice, and finally an LSI-based RAID card to support the eight 3.5″ drives being used in the hot-swap drive cage.

With all of the cabling in place and cleaned up, it was time to fire up the system and see how things look.
With the system installed and fired up, the first thing I noticed was the amount of noise, 54 dBA actually, coming from the two 92mm fans on the drive cage. These seem to be spinning at full speed, though there isn’t a way to know, as they are powered directly from the PCB on the drive cage. This does make sense, as it is important to optimize for a full cage full of drives, some of which might spin in excess of 10k RPM, which can generate quite a bit of heat. Also, this case may find itself being used in a dedicated datacenter or work area where sound isn’t much of an issue. Thankfully my final installation location for the CS382 is in a storage room, so the noise isn’t much of a factor for me. Thankfully you can utilize a fan controller or motherboard headers for these fans and their PWM connectors to tweak the fan speed to your liking if you require that.

I did also notice a bit of a resonating buzzing at times that I was able to pinpoint to the front of the case. This is definitely related to the group of 3.5″ drives installed in the drive cage, as when the system is first booting, the sound is not present, but as soon as those drives spin up and are active, the buzz appears. That being said, the buzz is not always there, and depending on the surface the case is placed, and with a bit of pushing and prodding, the buzz was typically not present. I think the plastic front door panel, paired with eight 7.2k RPM drives introduced a bit of additional noise to the case.